

Post by TasunkaWitko on May 15, 2013 16:43:12 GMT -5
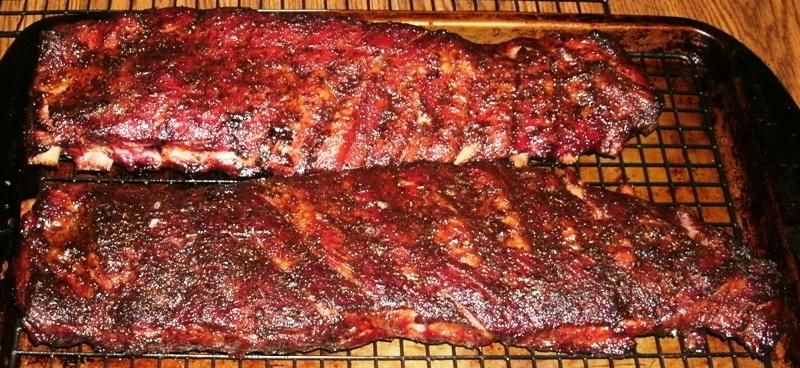
t has many names: bark, crust, and Mr. Brown - It's that dark, crusty-crunchy-savory crust that develops on good ribs as they cook. It's found on all barbecue, but can be particularly elusive on ribs.
Here are a few suggestions that can help; all suggestions are based on my experience with my well-modified offset smoker (first Brinkmann, then Char-Broil - they are identical), using charcoal or wood as fuel:

Your pit and fuel may require slight adjustments.
Sugar in the rub is a given, but too much will toss the flavour out of balance and also could lead to carbonisation; if that happens, the ribs will look bad, but still taste fine - however, if presentation is important, this is something to keep in mind. Turbinado sugar (also known as sugar in the raw) is better than brown sugar for preventing carbonisation, and light years better than white sugar.
Mustard slather before the rub is applied definitely helps! I've had the best results brushing on a thin layer of "plain, ol' yeller mustard" (French's or Wal-Mart each seem to work quite well - Koops was really good, too, but I have limited availibility to that one). I've tried olive oil and other things, but mustard gives the best results, and there WILL NOT be any "mustardy" taste on the finished ribs - believe me, if there were, I would know! lol
Go ahead and put a little more rub on when you throw the ribs on the grate - it can't hurt!
Where cooking temperatures are concerned, I keep them in the 240 to 260 range, with an average of about 242, probably. I tend to start the ribs at the low-end of the range (or even a bit lower, as long as it's above 212), and gradually work them over to the high end of the range as the cook progresses. The lower end at the beginning helps with the smoke ring, while the rub "sets." About 45 minutes or so before the end of the cook, they are as close to the heat source as they can get without scorching (in my offset, they would be almost all the way on the left-hand side near the firebox). The higher temp at the end helps with the bark and glazing.
I start the cook with a water pan in my offset (large-sized bread pan filled with boiling-temperature water) placed right in front of the "hole" between the firebox and the cooking chamber. I've found that the water pan REALLY improves not only smoke ring development, but also the way the smoke works into the meat. It's important to keep temps above 212 at a minimum to avoid creosote. more reading on this concept here:
foodsoftheworld.activeboards.net/smoke-ring-in-barbeque-meats_topic2373.html
The water in the pan gradually boils away of course, but no need to refill it - as the cook progresses, smoke ring development loses its importance and bark development gains in importance. The gradually-dryer atmosphere as the water simmers away will dovetail with these priorities.
Please, please please - do NOT foil the ribs! The moisture from the steam in the foil will give you braised ribs with a soft exterior and a potentially-mushy interior. I know that "fall of the bone" ribs are popular in the big restaurants, and if you really want them to be that way, this is the way to do it - BUT! If a good bark is your goal, then save the foil for something else!
Spritzing/mopping - go ahead and do it, but keep it to once every 45 minutes to an hour. Two things that really help are a) to wait an hour or so into the cook, maybe even two hours, until the rub "sets." You will know when it happens, because the rub won't look like it's going to slough off at the slightest touch. Another thing is to have some sort of fat going onto the ribs at the same time that you're spritzing them. You can do this either by adding a little olive oil (or some other oil) to the spritz (be sure to shake or blend it right before applying), OR by brushing a little onto the ribs - by a little, I do mean a little. As the ribs start to render their own fat, brush it around on them as well. This provides a basting effect that works with the rub and the mop to really cook everything in and give you a nice bark. PS - it's easy to over-do the spritzing, but I think that the basting can't be over-done.
A glaze will indeed help - it can be anything you want as long as it is at least sorta thick and contains some sort of sugar element. It can be as simple as honey or quite elaborate. One really good one I've found that is well-balanced and works like a charm comes from Danny Gaulden - it consists of equal parts (about 1/4 or 1/3 cup each) of brown sugar, yellow mustard and apple cider vinegar. Heat on the stove, stirring often, until everything is incorporated and dissolved - and just starting to "cook" and darken; then let it cool. This tastes great and provides a beautiful, deep-mohogany colour along with a crackle and shine. Two common mistakes with glaze are applying too much and applying it too often; start 30 or 45 minutes before you expect to be finished. Brush on a THIN layer, then another 15 mintues or so later, and then perhaps one more. Each time, the heat (which is now much dryer than at the beginning, due to the lower moisture) will "shrink-dry" the glaze onto the ribs and cook it in. Keep an eye out to avoid blackening, which comes from heat that is too high or too close. Right as you pull the ribs off the heat, brush one final THIN layer on, and you're good to go; the residual heat will set it in and provide the final touch.
Those are some ideas - I have tried them all; some alone, some in combination and sometimes all within one cook - good results every time.
Look everything over and if you have any questions, just ask. Any or all should help improve your bark development. The key, I think, is to "stick to basics" and not be too elaborate. Everything up there looks back to the old school, and the little things they would do to make good ribs just a little better, edging toward great barbecue!
Here are a few suggestions that can help; all suggestions are based on my experience with my well-modified offset smoker (first Brinkmann, then Char-Broil - they are identical), using charcoal or wood as fuel:
Your pit and fuel may require slight adjustments.
Sugar in the rub is a given, but too much will toss the flavour out of balance and also could lead to carbonisation; if that happens, the ribs will look bad, but still taste fine - however, if presentation is important, this is something to keep in mind. Turbinado sugar (also known as sugar in the raw) is better than brown sugar for preventing carbonisation, and light years better than white sugar.
Mustard slather before the rub is applied definitely helps! I've had the best results brushing on a thin layer of "plain, ol' yeller mustard" (French's or Wal-Mart each seem to work quite well - Koops was really good, too, but I have limited availibility to that one). I've tried olive oil and other things, but mustard gives the best results, and there WILL NOT be any "mustardy" taste on the finished ribs - believe me, if there were, I would know! lol
Go ahead and put a little more rub on when you throw the ribs on the grate - it can't hurt!
Where cooking temperatures are concerned, I keep them in the 240 to 260 range, with an average of about 242, probably. I tend to start the ribs at the low-end of the range (or even a bit lower, as long as it's above 212), and gradually work them over to the high end of the range as the cook progresses. The lower end at the beginning helps with the smoke ring, while the rub "sets." About 45 minutes or so before the end of the cook, they are as close to the heat source as they can get without scorching (in my offset, they would be almost all the way on the left-hand side near the firebox). The higher temp at the end helps with the bark and glazing.
I start the cook with a water pan in my offset (large-sized bread pan filled with boiling-temperature water) placed right in front of the "hole" between the firebox and the cooking chamber. I've found that the water pan REALLY improves not only smoke ring development, but also the way the smoke works into the meat. It's important to keep temps above 212 at a minimum to avoid creosote. more reading on this concept here:
foodsoftheworld.activeboards.net/smoke-ring-in-barbeque-meats_topic2373.html
The water in the pan gradually boils away of course, but no need to refill it - as the cook progresses, smoke ring development loses its importance and bark development gains in importance. The gradually-dryer atmosphere as the water simmers away will dovetail with these priorities.
Please, please please - do NOT foil the ribs! The moisture from the steam in the foil will give you braised ribs with a soft exterior and a potentially-mushy interior. I know that "fall of the bone" ribs are popular in the big restaurants, and if you really want them to be that way, this is the way to do it - BUT! If a good bark is your goal, then save the foil for something else!
Spritzing/mopping - go ahead and do it, but keep it to once every 45 minutes to an hour. Two things that really help are a) to wait an hour or so into the cook, maybe even two hours, until the rub "sets." You will know when it happens, because the rub won't look like it's going to slough off at the slightest touch. Another thing is to have some sort of fat going onto the ribs at the same time that you're spritzing them. You can do this either by adding a little olive oil (or some other oil) to the spritz (be sure to shake or blend it right before applying), OR by brushing a little onto the ribs - by a little, I do mean a little. As the ribs start to render their own fat, brush it around on them as well. This provides a basting effect that works with the rub and the mop to really cook everything in and give you a nice bark. PS - it's easy to over-do the spritzing, but I think that the basting can't be over-done.
A glaze will indeed help - it can be anything you want as long as it is at least sorta thick and contains some sort of sugar element. It can be as simple as honey or quite elaborate. One really good one I've found that is well-balanced and works like a charm comes from Danny Gaulden - it consists of equal parts (about 1/4 or 1/3 cup each) of brown sugar, yellow mustard and apple cider vinegar. Heat on the stove, stirring often, until everything is incorporated and dissolved - and just starting to "cook" and darken; then let it cool. This tastes great and provides a beautiful, deep-mohogany colour along with a crackle and shine. Two common mistakes with glaze are applying too much and applying it too often; start 30 or 45 minutes before you expect to be finished. Brush on a THIN layer, then another 15 mintues or so later, and then perhaps one more. Each time, the heat (which is now much dryer than at the beginning, due to the lower moisture) will "shrink-dry" the glaze onto the ribs and cook it in. Keep an eye out to avoid blackening, which comes from heat that is too high or too close. Right as you pull the ribs off the heat, brush one final THIN layer on, and you're good to go; the residual heat will set it in and provide the final touch.
Those are some ideas - I have tried them all; some alone, some in combination and sometimes all within one cook - good results every time.
Look everything over and if you have any questions, just ask. Any or all should help improve your bark development. The key, I think, is to "stick to basics" and not be too elaborate. Everything up there looks back to the old school, and the little things they would do to make good ribs just a little better, edging toward great barbecue!


