Post by Lannie on Jul 19, 2010 16:36:14 GMT -5
I've had a couple of people now ask me if I could post my method of making whole wheat bread, with pictures, so last time I made bread, I stopped and snapped a pic at each step. A picture is worth more than a thousand words, anyway, right? 
This is no new innovation on my part - it's simply the method I learned from Laurel's Kitchen Bread Book, so those of you that have it already know this, but those that don't might appreciate the info. So....
This recipe is for milk bread, and is enough for two loaves.
The ingredients you will need are:
6 cups whole wheat flour (coarse grind is just fine)
2-1/2 teaspoons salt
2 cups milk, scalded and cooled to "warm" *
1/4 cup honey
2 level teaspoons active dry yeast dissolved in 1/2 cup warm water
1/2 cup additional water to work into the dough (room temperature)
Approximately 2 to 4 tablespoons cold butter in small chips **
* Laurel's Kitchen Bread Book says there's an enzyme in milk (which isn't specified in the book) that will inhibit the yeast from working, but that heating the milk until a skin forms on top will deactivate this enzyme and allow the bread to rise. I haven't experimented yet with using unscalded milk just in case the book is right - I hand grind my wheat and don't want to waste a whole 6 cups on an experiment! Oh! And after the milk is cooled down a bit, take the skin off.
** I take a frozen chunk of butter and use a large kitchen knife to break and shatter it up into small pieces, like you would chocolate. It only takes a minute to do it this way. Trying to cut tiny pieces of unfrozen butter is way time consuming.
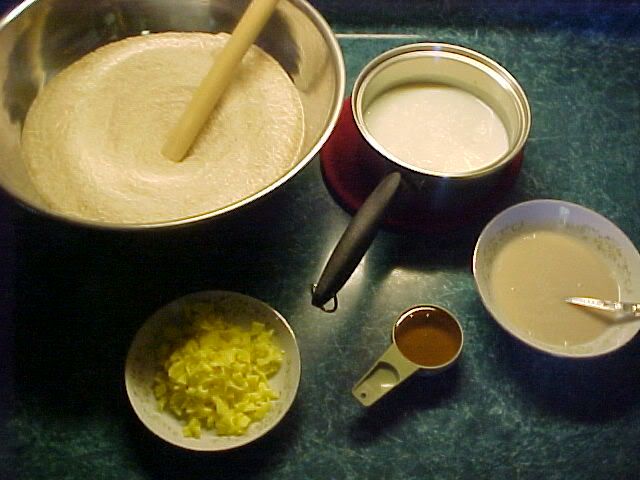
Here are all the ingredients, ready to go:
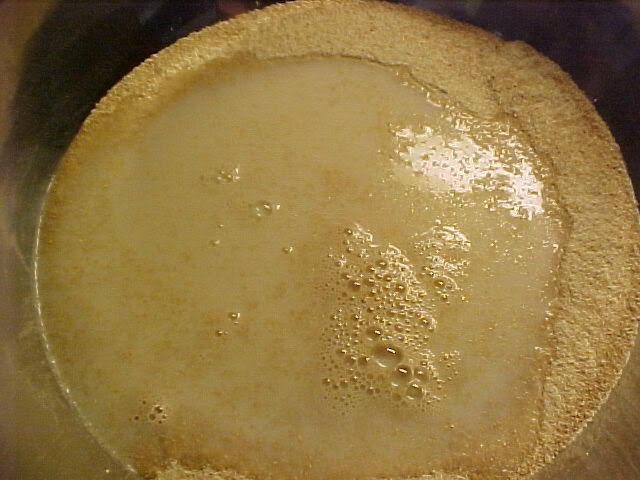
Stir the salt into the flour and make a well in the center. Dissolve the honey into the warm milk, and once incorporated, pour that and the dissolved yeast into the center of the well:
Stir from the center outward, picking up flour from the sides as you go:
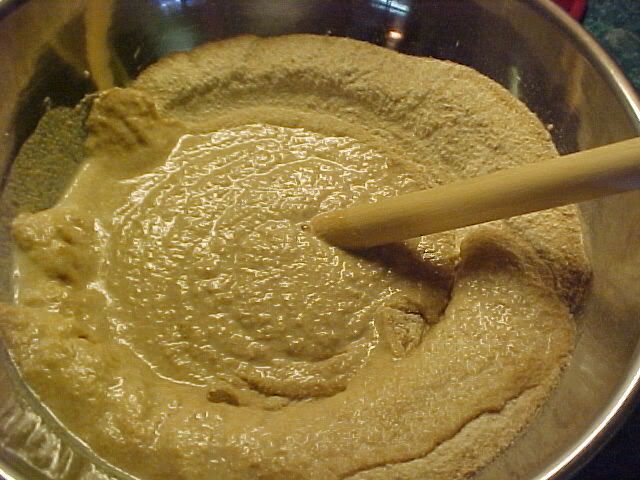
You'll have a mess when you're done, but don't despair:
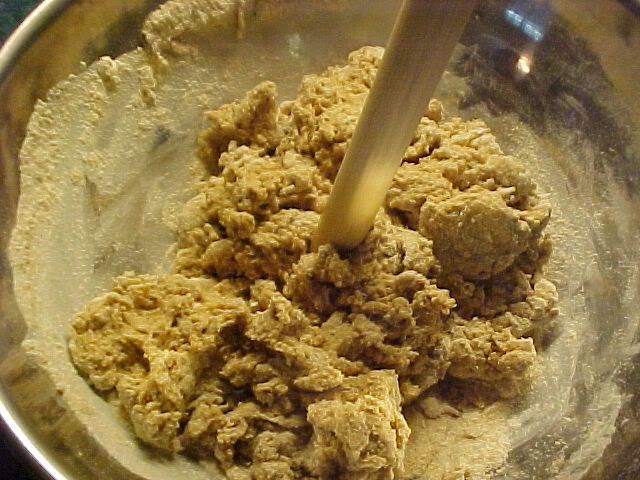
From here on out, I use a KitchenAid mixer, and my instructions are for that. If you're hand-kneading, it will take a little more work, but you'll get there.
Scrape the lumpy dough mess into the mixing bowl and turn it on low for a minute, then increase to Speed 2. While you're running the mixer, very slowly add the additional 1/2 cup of room temperature water, just a few drops at a time. If you're hand-kneading, just keep dunking your hands in a bowl of water and incorporating that into your dough until it comes together nicely.
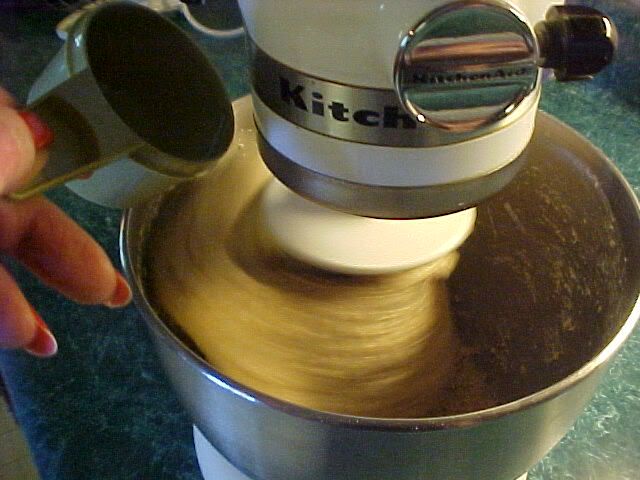
After about 5 minutes in the mixer, it will look like this:
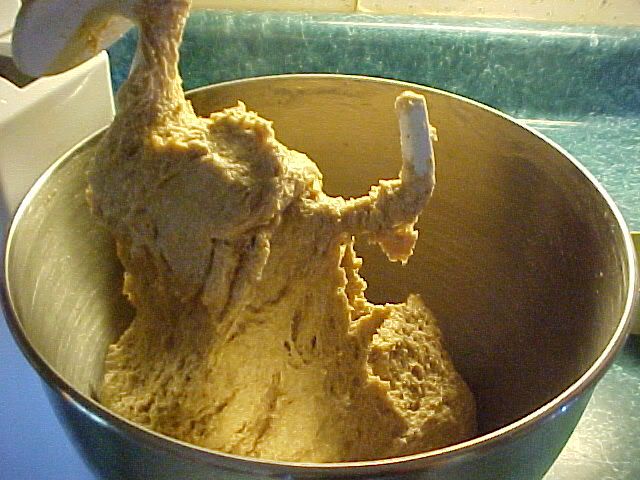
That looks pretty yukky, but it will get better, I promise. Keep running the mixer (or hand kneading) until it looks more like this:
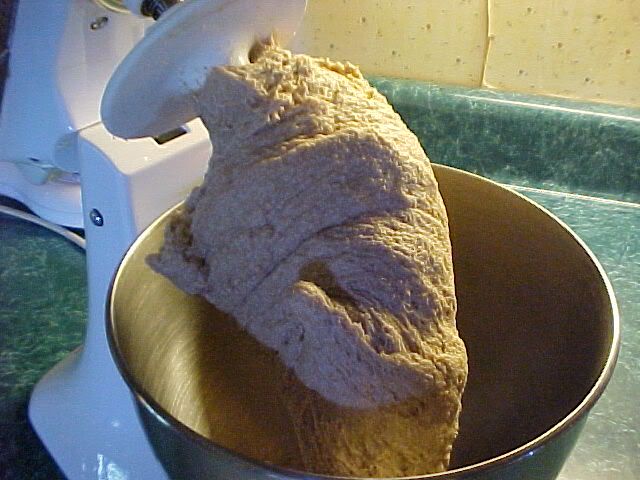
That should take another 10 minutes or so. When it's starting to resemble bread dough, pull it out, pat it out into a circle and sprinkle your frozen butter chips over it. I leave my butter chips IN the freezer right up until I scatter them on the dough. The colder they are at this point, the better. Use water on your hands and work surface to keep the dough from sticking.
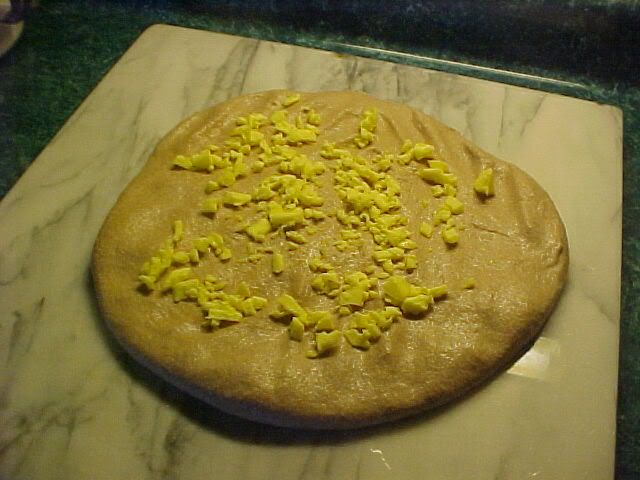
Then fold and press...
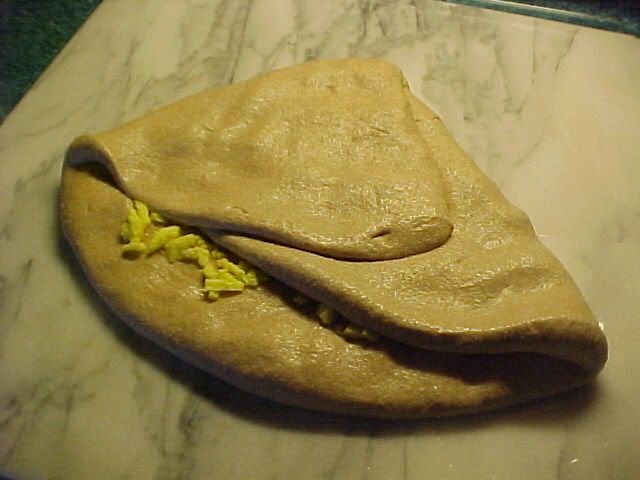
Until you have a semblance of a ball of dough. Pop it back into the mixer and run it at Speed 2 for a few more minutes. You want the butter to be incorporated, but you don't want it to melt.
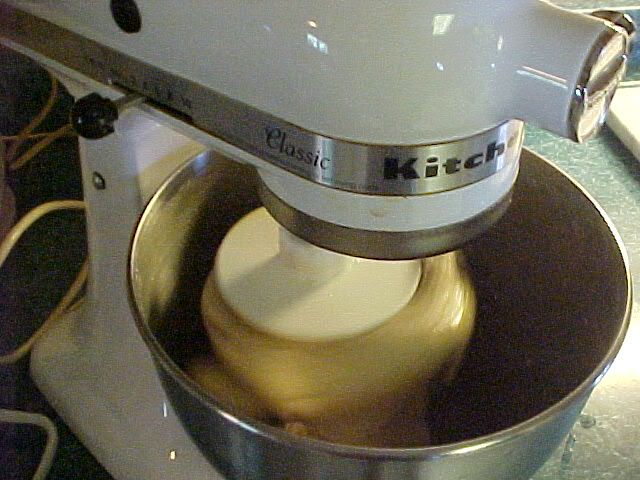
Remove the dough from the mixer, form it into a ball, and put it in the bottom of a CLEAN, DRY bowl. I have stainless steel, but any kind of bowl will do. It should be large, because you're going to work the dough in the bowl in the next step:
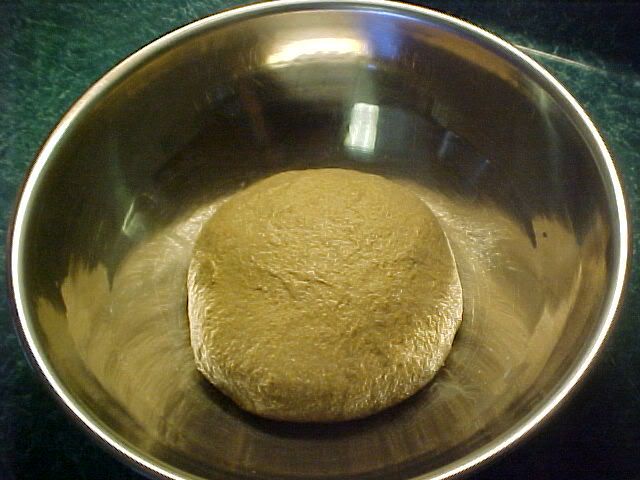
Cover the bowl with plastic wrap and let it rise as close to 80 degrees as possible. The day I made this bread, it was 80 in the house, so I just left it on the counter, but normally, I put it in the oven with the light on, which keeps it just about 80. The temperature is important. At 80 degrees, it should take about an hour and a half on the first rise, but it will be much longer at 70 degrees. (These temps are all in Fahrenheit, by the way.)
To test and see if the dough is ready, wet your finger and poke it. The dough should NOT spring back at all. If it does, leave it a little longer.
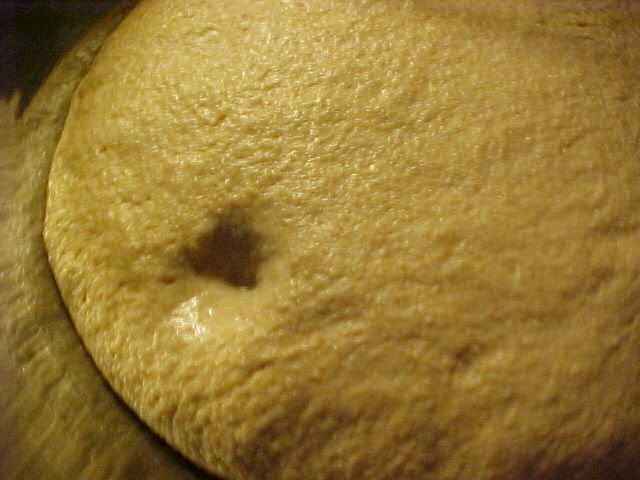
If it's ready, then you want to deflate it in the bowl by pressing down with wet hands in the center, then around the outside. You want to try to press any air pockets out, so go ahead and squish it, but don't manhandle it.
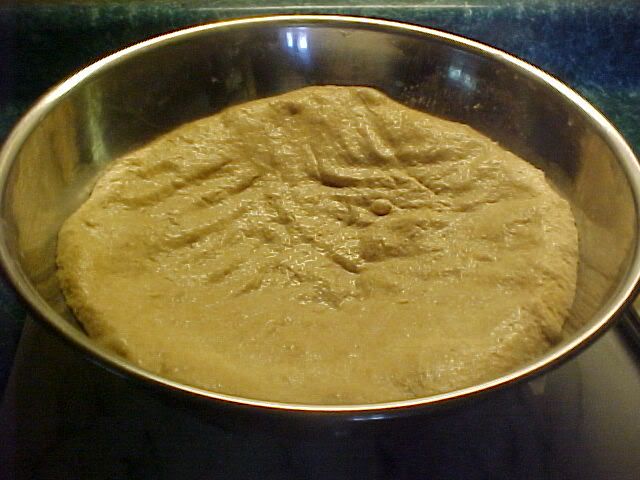
Once the dough is deflated, take a rubber spatula and free the edges all the way around:
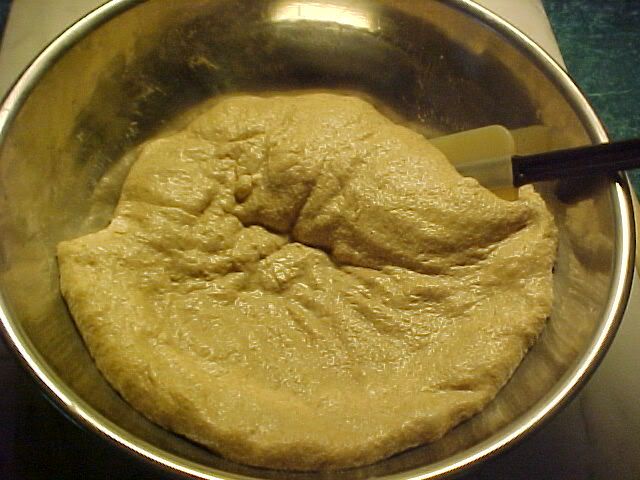
Again with wet hands, turn the edges under and gently shape the dough into a ball once more. Handle it gently, so as not to tear the gluten film that has formed on the top. I wasn't so careful last time, and that's exactly what happened to me:
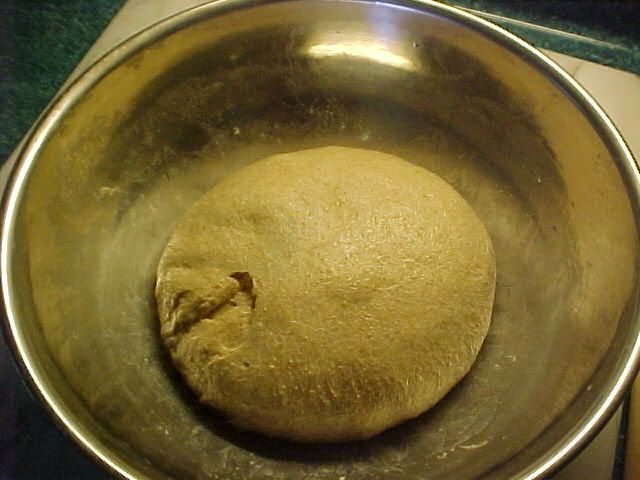
That is a picture of what NOT to do. LOL! The split got bigger and bigger, and I ended up turning it out of the bowl, re-kneading it for a minute and reshaping the ball, which cost me about an hour. So don't do that.
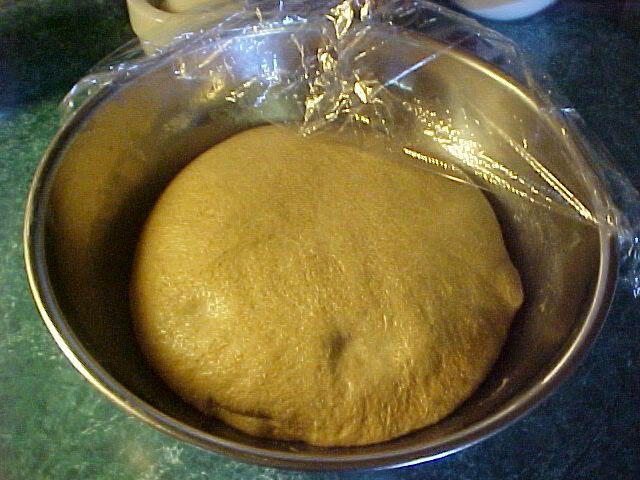
Here is my reshaped ball of dough after its second rise. The second rise SHOULD only take 45 minutes to an hour (unless you mess up like I did). Use the wet finger poke to test and make sure it's ready:
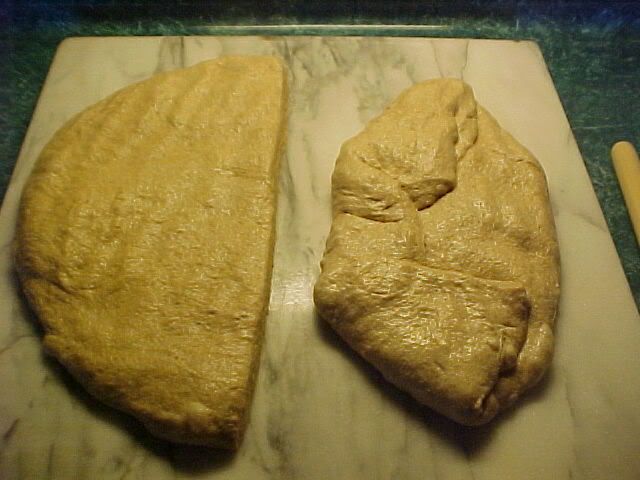
Use the spatula to help the dough ball out of the bowl and onto your work surface, which should be sprayed with water (or just wipe your wet hands around on the counter). Tip the dough out so its top is now on the bottom, flatten it out with your hands and cut it in half. Fold the edges in on each half until you've made a ball of dough. I've done one of them partway here to show you how to start.
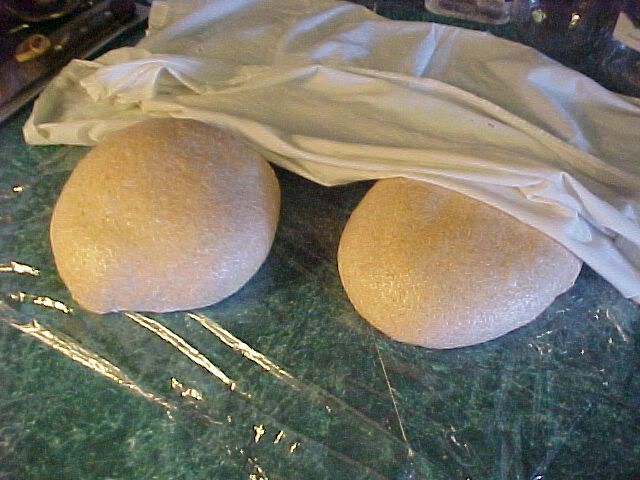
When you have two balls of dough, let them rest under a damp towel for 10 to 15 minutes:
While the dough is resting, grease your pans (I use butter), wash out your bowl, go check on your cow, whatever.
Take one ball of dough out from under the damp towel (leave the other one there so it doesn't dry out) and using the tiniest bit of flour you can get away with, flatten it out with a rolling pin into a large circle. Fold it down almost in half like this:
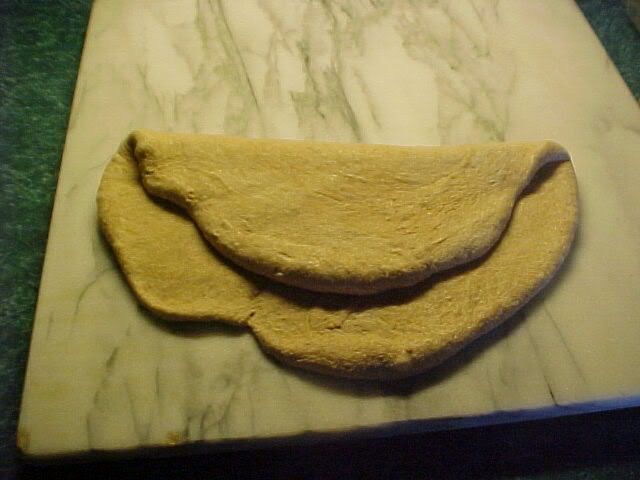
Use flour as necessary to keep it from sticking to the rolling pin or the work surface, but not so much that it won't stick to itself.
Then fold the sides in like so:
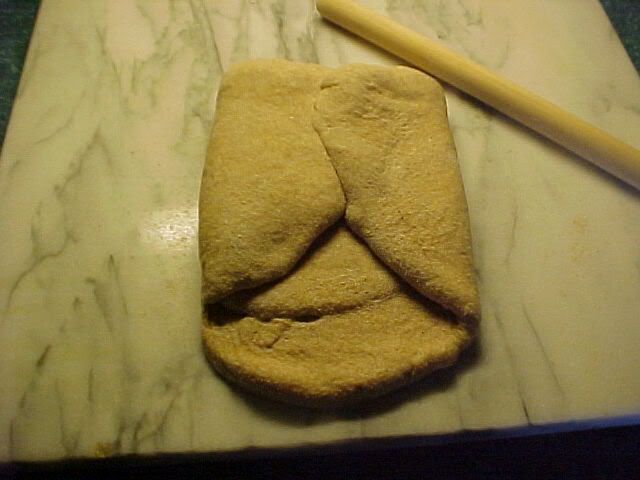
Then roll the whole thing out and pop out any air bubbles. It should be a tiny bit wider than your bread pans.
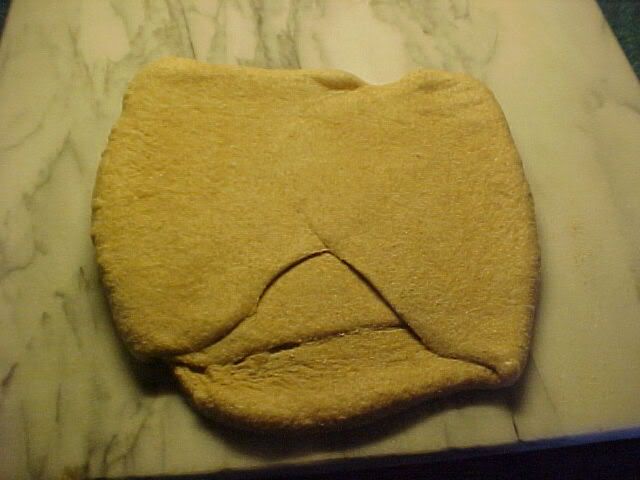
Now starting at the farthest edge, roll it tightly toward you, aiming for no air gaps:
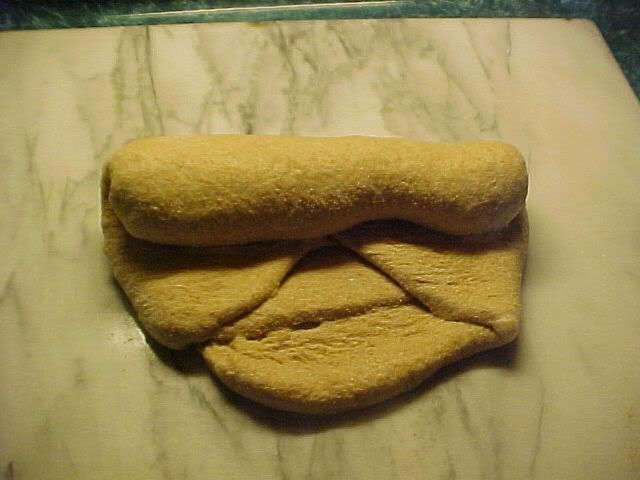
It helps if you splash a bit of water on the near edge to help it stick when you finish rolling. Then pinch the seam, and pinch the sides to close:
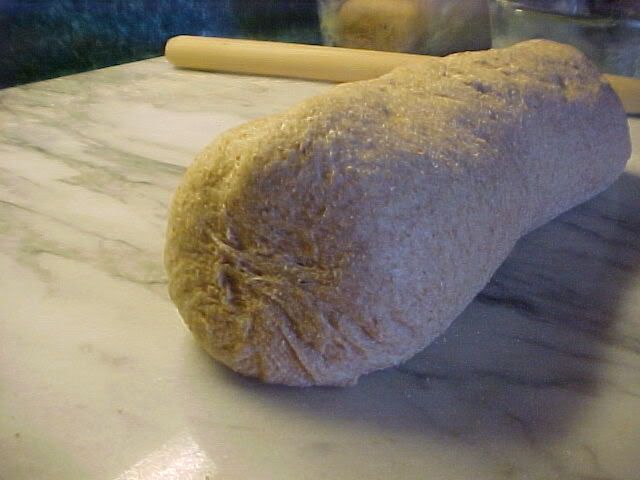
Place in your greased bread pans seam side down:
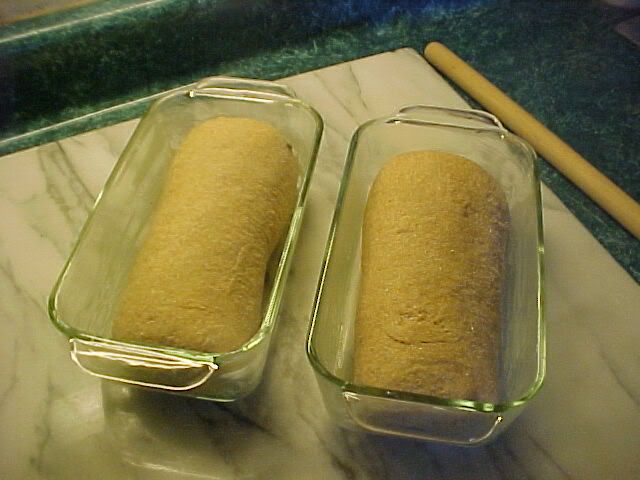
Cover with the damp towel and let rise at a temperature of 90 degrees. I find if I put a bowl of very hot water under them inside the oven with the light on, the hot water will bump it up those few extra degrees. You might have to change the hot water once or twice, and if you have a thermometer, stick it in there with your rising loaves to make sure they're warm enough. At 90 degrees, it should only take maybe half an hour for the loaves to rise, but the cooler it is, the longer it will take, so keep an eye on them.
When they've risen nicely (not hugely), bring them out of the oven (leave them covered) and preheat the oven to 350 degrees. If you can set the bread pans in a baking dish with hot water in it, it will help keep the heat steady in the dough while the oven is preheating.
When the oven is ready, make a shallow slice down the center of each loaf to allow for "oven spring."
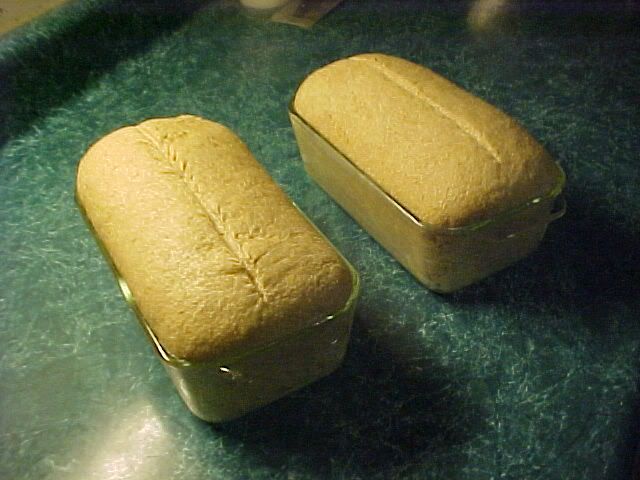
Then put in the oven and bake for 40 minutes, or until done. Turn out on a rack to cool.
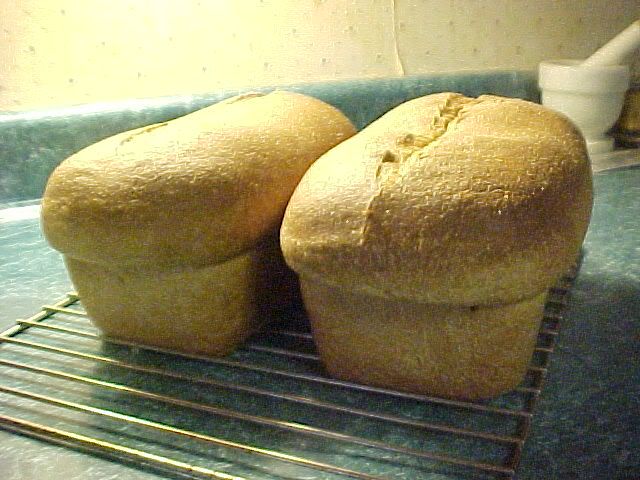
Here's one sliced (the next day) after it was completely cooled. There are no air pockets anywhere, which was my bane before:
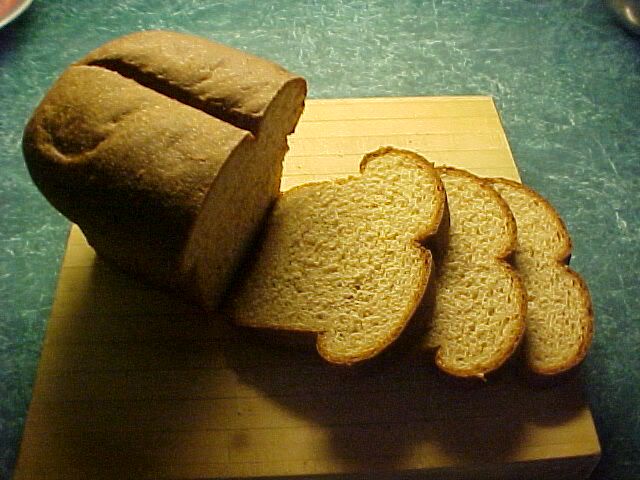
The bread is soft and light, and in no way resembles a brick! And the flavor is fabulous!
~Lannie

This is no new innovation on my part - it's simply the method I learned from Laurel's Kitchen Bread Book, so those of you that have it already know this, but those that don't might appreciate the info. So....
This recipe is for milk bread, and is enough for two loaves.
The ingredients you will need are:
6 cups whole wheat flour (coarse grind is just fine)
2-1/2 teaspoons salt
2 cups milk, scalded and cooled to "warm" *
1/4 cup honey
2 level teaspoons active dry yeast dissolved in 1/2 cup warm water
1/2 cup additional water to work into the dough (room temperature)
Approximately 2 to 4 tablespoons cold butter in small chips **
* Laurel's Kitchen Bread Book says there's an enzyme in milk (which isn't specified in the book) that will inhibit the yeast from working, but that heating the milk until a skin forms on top will deactivate this enzyme and allow the bread to rise. I haven't experimented yet with using unscalded milk just in case the book is right - I hand grind my wheat and don't want to waste a whole 6 cups on an experiment! Oh! And after the milk is cooled down a bit, take the skin off.
** I take a frozen chunk of butter and use a large kitchen knife to break and shatter it up into small pieces, like you would chocolate. It only takes a minute to do it this way. Trying to cut tiny pieces of unfrozen butter is way time consuming.

Here are all the ingredients, ready to go:

Stir the salt into the flour and make a well in the center. Dissolve the honey into the warm milk, and once incorporated, pour that and the dissolved yeast into the center of the well:

Stir from the center outward, picking up flour from the sides as you go:

You'll have a mess when you're done, but don't despair:

From here on out, I use a KitchenAid mixer, and my instructions are for that. If you're hand-kneading, it will take a little more work, but you'll get there.
Scrape the lumpy dough mess into the mixing bowl and turn it on low for a minute, then increase to Speed 2. While you're running the mixer, very slowly add the additional 1/2 cup of room temperature water, just a few drops at a time. If you're hand-kneading, just keep dunking your hands in a bowl of water and incorporating that into your dough until it comes together nicely.

After about 5 minutes in the mixer, it will look like this:

That looks pretty yukky, but it will get better, I promise. Keep running the mixer (or hand kneading) until it looks more like this:

That should take another 10 minutes or so. When it's starting to resemble bread dough, pull it out, pat it out into a circle and sprinkle your frozen butter chips over it. I leave my butter chips IN the freezer right up until I scatter them on the dough. The colder they are at this point, the better. Use water on your hands and work surface to keep the dough from sticking.

Then fold and press...

Until you have a semblance of a ball of dough. Pop it back into the mixer and run it at Speed 2 for a few more minutes. You want the butter to be incorporated, but you don't want it to melt.

Remove the dough from the mixer, form it into a ball, and put it in the bottom of a CLEAN, DRY bowl. I have stainless steel, but any kind of bowl will do. It should be large, because you're going to work the dough in the bowl in the next step:

Cover the bowl with plastic wrap and let it rise as close to 80 degrees as possible. The day I made this bread, it was 80 in the house, so I just left it on the counter, but normally, I put it in the oven with the light on, which keeps it just about 80. The temperature is important. At 80 degrees, it should take about an hour and a half on the first rise, but it will be much longer at 70 degrees. (These temps are all in Fahrenheit, by the way.)
To test and see if the dough is ready, wet your finger and poke it. The dough should NOT spring back at all. If it does, leave it a little longer.

If it's ready, then you want to deflate it in the bowl by pressing down with wet hands in the center, then around the outside. You want to try to press any air pockets out, so go ahead and squish it, but don't manhandle it.

Once the dough is deflated, take a rubber spatula and free the edges all the way around:

Again with wet hands, turn the edges under and gently shape the dough into a ball once more. Handle it gently, so as not to tear the gluten film that has formed on the top. I wasn't so careful last time, and that's exactly what happened to me:

That is a picture of what NOT to do. LOL! The split got bigger and bigger, and I ended up turning it out of the bowl, re-kneading it for a minute and reshaping the ball, which cost me about an hour. So don't do that.

Here is my reshaped ball of dough after its second rise. The second rise SHOULD only take 45 minutes to an hour (unless you mess up like I did). Use the wet finger poke to test and make sure it's ready:

Use the spatula to help the dough ball out of the bowl and onto your work surface, which should be sprayed with water (or just wipe your wet hands around on the counter). Tip the dough out so its top is now on the bottom, flatten it out with your hands and cut it in half. Fold the edges in on each half until you've made a ball of dough. I've done one of them partway here to show you how to start.

When you have two balls of dough, let them rest under a damp towel for 10 to 15 minutes:

While the dough is resting, grease your pans (I use butter), wash out your bowl, go check on your cow, whatever.
Take one ball of dough out from under the damp towel (leave the other one there so it doesn't dry out) and using the tiniest bit of flour you can get away with, flatten it out with a rolling pin into a large circle. Fold it down almost in half like this:

Use flour as necessary to keep it from sticking to the rolling pin or the work surface, but not so much that it won't stick to itself.
Then fold the sides in like so:

Then roll the whole thing out and pop out any air bubbles. It should be a tiny bit wider than your bread pans.

Now starting at the farthest edge, roll it tightly toward you, aiming for no air gaps:

It helps if you splash a bit of water on the near edge to help it stick when you finish rolling. Then pinch the seam, and pinch the sides to close:

Place in your greased bread pans seam side down:

Cover with the damp towel and let rise at a temperature of 90 degrees. I find if I put a bowl of very hot water under them inside the oven with the light on, the hot water will bump it up those few extra degrees. You might have to change the hot water once or twice, and if you have a thermometer, stick it in there with your rising loaves to make sure they're warm enough. At 90 degrees, it should only take maybe half an hour for the loaves to rise, but the cooler it is, the longer it will take, so keep an eye on them.
When they've risen nicely (not hugely), bring them out of the oven (leave them covered) and preheat the oven to 350 degrees. If you can set the bread pans in a baking dish with hot water in it, it will help keep the heat steady in the dough while the oven is preheating.
When the oven is ready, make a shallow slice down the center of each loaf to allow for "oven spring."

Then put in the oven and bake for 40 minutes, or until done. Turn out on a rack to cool.

Here's one sliced (the next day) after it was completely cooled. There are no air pockets anywhere, which was my bane before:

The bread is soft and light, and in no way resembles a brick! And the flavor is fabulous!
~Lannie


