Post by kwantmfuzzix on Apr 1, 2009 20:46:41 GMT -5
Let's start this with some hardwood (soaks in less moisture than softwoods). I’ve been doing some research on woods used for food preparation and have discovered that not only hardwood is the best for this, but certain types of hardwoods are better. The food-safe hardwoods are tight-grained, the best of the domestics being maple, birch, and beech. White oak is OK, but stay away from red oak, cherry, and even some walnuts because they have larger pores. The smaller pores leave fewer hiding places for food-borne bacteria than the open-grained woods. Bamboo, which is actually a grass, is another really safe option, but much harder to work with.
The lighter wood colors are also better. Woods like walnut, purpleheart, or other really dark woods will allow their colors to leech into the food when wet for any extended periods (such as cheese presses or butter molds). This is especially true if you choose to use diluted chlorine bleach to sanitize your wooden kitchen tools. Those dark colors are fine for tools like cutting boards or spatulas. So, because we were near a wood supply store recently (our once-a-month shopping trip), I sorted through the hardwood section until I found a nice piece of really light-and-tight maple ($6 for a 1” x 4” x 48” piece, which I will rip into two thinner pieces before I start this project). Use solid woods too, not laminates.
Lannie wants to be able to use her antique butter dish, which holds one stick of standard-sized butter, so the primary measurements for this project will be based on the size of a store-bought stick. A stick of butter, those found in American stupidmarkets anyway, measure 1 1/8” x 1 1/8” x 4 ¾”. The other important dimension is the thickness of the wood you have chosen to use. In my case, the maple will be ripped to 1/2” thick. Because you will need as much access to the finished butter sticks as possible, we cannot simply make a box and expect the stick to fall out when it has hardened, so I designed this mold with swing-away walls.
Materials list: You need to cut this 1/2” maple so you get one piece that is 4 3/4” x 3 3/4” (labeled A in drawings below), two pieces that are 3 3/4” x 1 5/8” (labeled B1 and B2) and three pieces that are 4 3/4” x 1 3/8” (labeled C1, C2, and C3). You also need some fine and extra-fine sandpaper, some finishing oil, two small hinges, one small clasp, seven 1” wood screws and/or wood glue. The hardware (hinges and clasp) should be brass (or brass plated) or stainless steel so they will last longer without rust issues when exposed to moisture. That hardware probably comes with its own screws or tiny nails, but if not, you will need to acquire appropriately-sized fasteners.
Equipment list: You need a saw (I used a small contractor's table saw), a hand drill, a screwdriver, and, depending on your skill level at making dado cuts, a router or dado blade for your saw. It would also be advisable to have a few wood clamps to hold the pieces together while installing the screws and/or glue.

Making the Base: Measure and mark the lines for the dado cuts on Piece A (see Figure 1). Depending on your available equipment and skill levels, you can make these cuts a variety of ways. I don't have a dado blade and didn't want to screw around with the router, so I simply made the outside cuts (inside the pencil lines), then gently and carefully moved the wood back and forth across the saw blade until the centers were vacated.
Making Sides/Ends: These pieces are very straight forward. Simply cut two rectangular pieces 3 3/4” x 1 5/8” and three pieces 4 3/4” x 1 3/8”.
Sand all pieces on all surfaces using a fine grit sandpaper. When you can rub your fingertips over the wood and feel no imperfections, proceed to assembly.
Assembly: Line up end piece B1 with one end of the base piece A and clamp tightly. Drill two pilot holes through the end piece so as to enter the base in the center of each of the butter platforms. You can use a good wood glue in place of the screws or use a little glue plus the screws (I did the latter). Once the screws are in tight, remove the clamp and insert one C-piece in the center slot. You might also like to clamp that tightly while installing the screws and/or glue (obviously, you would have put the glue in the slot before clamping the center wall into it). Drill a couple small pilot holes and put a couple screws through the base into the center wall. One more screw – drill a pilot in the end piece, about 2/3 up from the bottom, into the center wall and put another screw in there. You should now have a very tight and solid base with one end and center wall.

Adding Outside Walls: Place pieces C2 and C3 in their slots on the base and use a wood clamp to hold them tightly to the base and pressed up against the inside of the end piece (B1). Place one hinge between the side wall and end piece, mark the screw holes with a pencil, then remove and drill small pilot holes. Screw that hinge in place, then repeat this for the other side.
Add End Piece: Place end piece B2 against the open end to line up with all the other pieces and clamp in place. Drill two small pilot holes through one end of piece B2 so that they go into the end of side wall piece C2 (see Figure 3). Screw in the 1” wood screws. Don't take the clamp off yet. Line up your clasp hardware, mark where the screw holes need to be, then drill small pilot holes. Attach the clasp with the small screws. The result should look like Figure 3.
Finishing: When you are done with assembly, use a damp cloth to remove all the dust from your butter mold, then apply a penetrating finish. Note that membrane finishes (those that form a hard surface film) such as lacquer, polyurethane, or friction polish, will rub off with use and regular cleaning practices, leaving your wood unprotected and maybe even flaky looking. For the best protection, use a food-safe mineral or nut oil that deeply penetrates the wood.
Using a clean dry cloth (one that will not shed fibers), apply three coats of oil, allowing each to soak in for at least five minutes at a room temperature of at least 68 ºF (20 ºC), then wipe off any excess. Let the wood sit for at least 24 hours at room temperature, then use a very fine grit sandpaper (e.g., 220) to remove any “feathers” (tiny raised wood fibers) that might be sticking up through the finish. Repeat the above oil application process.
After you start using your mold, about once every three months, or whenever the wood starts looking dried out, reapply the protective oil finish to prevent water from damaging the wood.
Ongoing Care: After each use, hand wash your butter mold in warm, soapy water, rinse, then towel dry and let it air dry (this last part can happen in the cupboard). Never let this mold soak in water for extended periods of time, do not ever wash it in a dishwasher, and never put it in a microwave. Those practices will destroy the wood.
Have fun with it,
Rich
P.S. I'll add a photo to this thread when I actually get this finished. Even though I wrote the above text "as if" it was already done, the weather here is still in an "impending blizzard" state and cold enough that I can't warm the shop sufficiently to finish this project. The firewood pile is covered in snow and ice and we robbed the shop of all usable firewood, so completion of this project will have to wait. Maybe one of you in a warmer clime will finish one before I do; if so post your photo in this thread,
The lighter wood colors are also better. Woods like walnut, purpleheart, or other really dark woods will allow their colors to leech into the food when wet for any extended periods (such as cheese presses or butter molds). This is especially true if you choose to use diluted chlorine bleach to sanitize your wooden kitchen tools. Those dark colors are fine for tools like cutting boards or spatulas. So, because we were near a wood supply store recently (our once-a-month shopping trip), I sorted through the hardwood section until I found a nice piece of really light-and-tight maple ($6 for a 1” x 4” x 48” piece, which I will rip into two thinner pieces before I start this project). Use solid woods too, not laminates.
Lannie wants to be able to use her antique butter dish, which holds one stick of standard-sized butter, so the primary measurements for this project will be based on the size of a store-bought stick. A stick of butter, those found in American stupidmarkets anyway, measure 1 1/8” x 1 1/8” x 4 ¾”. The other important dimension is the thickness of the wood you have chosen to use. In my case, the maple will be ripped to 1/2” thick. Because you will need as much access to the finished butter sticks as possible, we cannot simply make a box and expect the stick to fall out when it has hardened, so I designed this mold with swing-away walls.
Materials list: You need to cut this 1/2” maple so you get one piece that is 4 3/4” x 3 3/4” (labeled A in drawings below), two pieces that are 3 3/4” x 1 5/8” (labeled B1 and B2) and three pieces that are 4 3/4” x 1 3/8” (labeled C1, C2, and C3). You also need some fine and extra-fine sandpaper, some finishing oil, two small hinges, one small clasp, seven 1” wood screws and/or wood glue. The hardware (hinges and clasp) should be brass (or brass plated) or stainless steel so they will last longer without rust issues when exposed to moisture. That hardware probably comes with its own screws or tiny nails, but if not, you will need to acquire appropriately-sized fasteners.
Equipment list: You need a saw (I used a small contractor's table saw), a hand drill, a screwdriver, and, depending on your skill level at making dado cuts, a router or dado blade for your saw. It would also be advisable to have a few wood clamps to hold the pieces together while installing the screws and/or glue.
Figure 1: Base Piece.
Making the Base: Measure and mark the lines for the dado cuts on Piece A (see Figure 1). Depending on your available equipment and skill levels, you can make these cuts a variety of ways. I don't have a dado blade and didn't want to screw around with the router, so I simply made the outside cuts (inside the pencil lines), then gently and carefully moved the wood back and forth across the saw blade until the centers were vacated.
Making Sides/Ends: These pieces are very straight forward. Simply cut two rectangular pieces 3 3/4” x 1 5/8” and three pieces 4 3/4” x 1 3/8”.
Sand all pieces on all surfaces using a fine grit sandpaper. When you can rub your fingertips over the wood and feel no imperfections, proceed to assembly.
Assembly: Line up end piece B1 with one end of the base piece A and clamp tightly. Drill two pilot holes through the end piece so as to enter the base in the center of each of the butter platforms. You can use a good wood glue in place of the screws or use a little glue plus the screws (I did the latter). Once the screws are in tight, remove the clamp and insert one C-piece in the center slot. You might also like to clamp that tightly while installing the screws and/or glue (obviously, you would have put the glue in the slot before clamping the center wall into it). Drill a couple small pilot holes and put a couple screws through the base into the center wall. One more screw – drill a pilot in the end piece, about 2/3 up from the bottom, into the center wall and put another screw in there. You should now have a very tight and solid base with one end and center wall.
Figure 2: Assembly of Base with Fixed End and Center Wall.
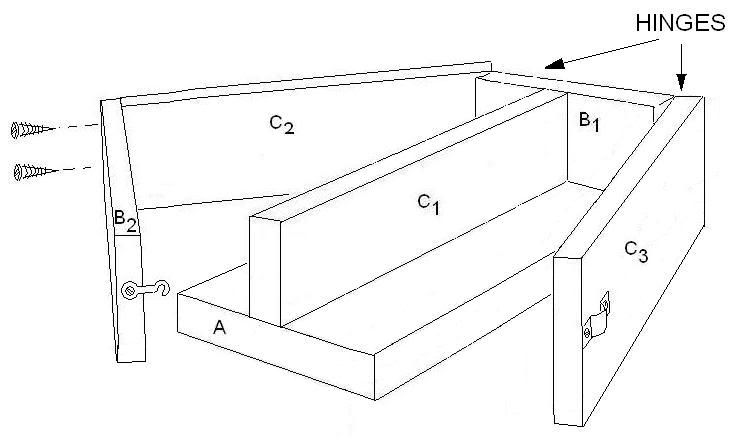
Adding Outside Walls: Place pieces C2 and C3 in their slots on the base and use a wood clamp to hold them tightly to the base and pressed up against the inside of the end piece (B1). Place one hinge between the side wall and end piece, mark the screw holes with a pencil, then remove and drill small pilot holes. Screw that hinge in place, then repeat this for the other side.
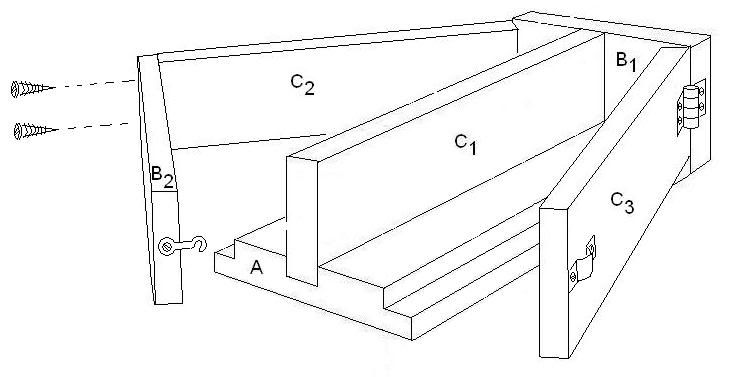
Add End Piece: Place end piece B2 against the open end to line up with all the other pieces and clamp in place. Drill two small pilot holes through one end of piece B2 so that they go into the end of side wall piece C2 (see Figure 3). Screw in the 1” wood screws. Don't take the clamp off yet. Line up your clasp hardware, mark where the screw holes need to be, then drill small pilot holes. Attach the clasp with the small screws. The result should look like Figure 3.
Figure 3: Completed Butter Mold.
Finishing: When you are done with assembly, use a damp cloth to remove all the dust from your butter mold, then apply a penetrating finish. Note that membrane finishes (those that form a hard surface film) such as lacquer, polyurethane, or friction polish, will rub off with use and regular cleaning practices, leaving your wood unprotected and maybe even flaky looking. For the best protection, use a food-safe mineral or nut oil that deeply penetrates the wood.
Using a clean dry cloth (one that will not shed fibers), apply three coats of oil, allowing each to soak in for at least five minutes at a room temperature of at least 68 ºF (20 ºC), then wipe off any excess. Let the wood sit for at least 24 hours at room temperature, then use a very fine grit sandpaper (e.g., 220) to remove any “feathers” (tiny raised wood fibers) that might be sticking up through the finish. Repeat the above oil application process.
After you start using your mold, about once every three months, or whenever the wood starts looking dried out, reapply the protective oil finish to prevent water from damaging the wood.
Ongoing Care: After each use, hand wash your butter mold in warm, soapy water, rinse, then towel dry and let it air dry (this last part can happen in the cupboard). Never let this mold soak in water for extended periods of time, do not ever wash it in a dishwasher, and never put it in a microwave. Those practices will destroy the wood.
Have fun with it,
Rich
P.S. I'll add a photo to this thread when I actually get this finished. Even though I wrote the above text "as if" it was already done, the weather here is still in an "impending blizzard" state and cold enough that I can't warm the shop sufficiently to finish this project. The firewood pile is covered in snow and ice and we robbed the shop of all usable firewood, so completion of this project will have to wait. Maybe one of you in a warmer clime will finish one before I do; if so post your photo in this thread,