
Post by jehuchris on Feb 26, 2010 13:15:41 GMT -5
Pretty much the stanchion is finished. Granted I have to put the feed tray on and the quick-release Velcro tail wrap but hey. I'll get around to it eventually.
But now it's time for the stanchion to got to a place of it's own. A milking parlor if you will. So I'm going to document my journey of constructing the parlor. So come on along if you'd like.
Here are some photos of the side of the barn that the parlor will be located just prior to any construction. Laura Lee liked doing some in black and white so some will be color some b/w.
I've decided to leave the floor gravel. I have a friend that blessed me with the wood you'll see lining the inside walls of the rooms and shed. Trees cut from her land and milled into lumber. Huge blessing to me.
DAY 1 Feb. 26, 2010
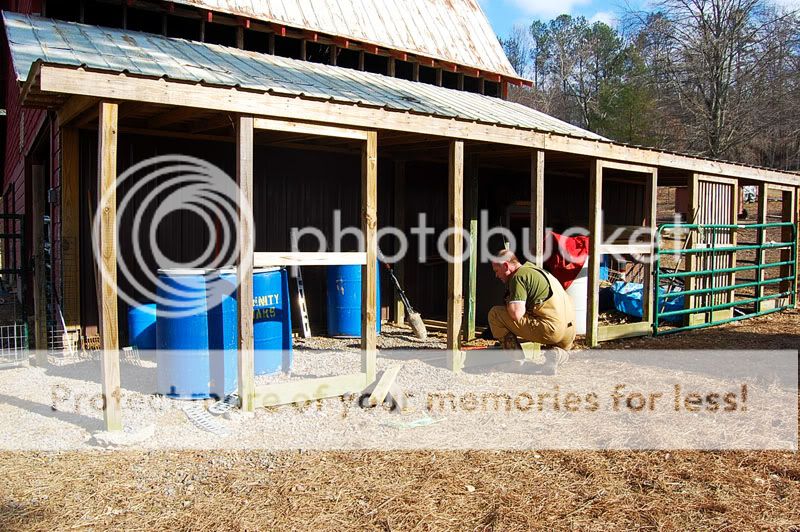
This area was originally for my hawk mews but now they are in a different type enclosure. If you look hard you can see vertical slats. This entire side was like this for the hawk mews and we've removed all of them.
From left to right will be milking parlor and milking room then food shed. Two end doors and three door along this long front. There will be a door between the milking parlor and the milking room.

The are to the left of the green gate will be the milk room. Blue barrel sitting in alone is where door to milking parlor will be. Enter and exit.
DAY 2 Feb. 27, 2010

b/w adds a different touch. Area with white barrel and hawk hut is where milk room w/sink and drying racks will eventually be.

Walls going up. This view is end of barn looking into where stanchion will go.
Construction halted due to inclement weather - bad in other words.
Day 3 March 4, 2010
I built all 4 of my "small" doors today. 3 will give access from the side of the shed and one is used to go from Milking Parlor to Milk room.


I only got one of the doors hung. It's a challenge for one person to hang these doors alone. And have them open correctly.
Monday the metal for the side of the shed is supposed to be in. It should go up quickly.
Day 4 March 5, 2010
Today I wired the Milking Parlor and the Milk Room. I stopped at this point because I have a wall to build between the Milk Room and the Shed portion. I have all the wood cut but don't have the wall constructed yet. Since the area where the Milking Parlor will be is where we store feed for the cows, the lights will help out immensely at night feeding.


Let there be LIGHT!!!! Ain't it wonderful!!
My hope is to build a door for this end of the shed that folds in the middle like a closet door. I will weld the frame and cover it with metal siding. Pray for me!!!!
Day 5 March 7, 2010 before lunch
Today I did a good bit of work but no photos. I put in 3 more 4x4 posts for walls and doors. 2 posts went in the area between the Milking Room and the Milking Shed. I also went ahead and built this wall so there is an official divider between all the rooms in the suite. (Anyone notice I changed the title of the thread to Construction of a Milking Suite)
This entire side of the barn will be dedicated to all things Leche de Vaca and therefore it is the Milking Suite. Milking Parlor, Milk Room and Feed for Cows.
Cut the opening for the window. Hope to hang the other 3 doors tomorrow and will post more pics.
Day 6 March 8, 2010
Today the doors were hung. And I'm leaving now to go pick up the metal for the exterior siding on the Suite.


Oops the milkmaid showed up for work early ;D ;D ;D
Day 7 March 9, 2010 Before Lunch
Today Linda and I put the siding on the long side of the Suite.


AFTER LUNCH - TRAGEDY STRIKES

Three old hens Frame the new chick....

The framed bird pleads for her life.......... She threatens to jump and end it all. Stay tuned for this egg-cracker of a story. Omelet team is on the scene.
Day 8 March 17, 2010
Today I built the folding end door. This was really a project within a project. It took all day to figure the sizes, cut the metal, figure the angles, weld the two folding door pieces, weld the hinges, mount the door to the parlor, attach wood to mount the siding and then mount the siding and the door latch. Hope the photos give a little description.


The crew checking out the finished product.
Keep checking back and I'll add more photos.
But now it's time for the stanchion to got to a place of it's own. A milking parlor if you will. So I'm going to document my journey of constructing the parlor. So come on along if you'd like.
Here are some photos of the side of the barn that the parlor will be located just prior to any construction. Laura Lee liked doing some in black and white so some will be color some b/w.
I've decided to leave the floor gravel. I have a friend that blessed me with the wood you'll see lining the inside walls of the rooms and shed. Trees cut from her land and milled into lumber. Huge blessing to me.
DAY 1 Feb. 26, 2010
This area was originally for my hawk mews but now they are in a different type enclosure. If you look hard you can see vertical slats. This entire side was like this for the hawk mews and we've removed all of them.
From left to right will be milking parlor and milking room then food shed. Two end doors and three door along this long front. There will be a door between the milking parlor and the milking room.
The are to the left of the green gate will be the milk room. Blue barrel sitting in alone is where door to milking parlor will be. Enter and exit.
DAY 2 Feb. 27, 2010
b/w adds a different touch. Area with white barrel and hawk hut is where milk room w/sink and drying racks will eventually be.
Walls going up. This view is end of barn looking into where stanchion will go.
Construction halted due to inclement weather - bad in other words.
Day 3 March 4, 2010
I built all 4 of my "small" doors today. 3 will give access from the side of the shed and one is used to go from Milking Parlor to Milk room.
I only got one of the doors hung. It's a challenge for one person to hang these doors alone. And have them open correctly.

Monday the metal for the side of the shed is supposed to be in. It should go up quickly.
Day 4 March 5, 2010
Today I wired the Milking Parlor and the Milk Room. I stopped at this point because I have a wall to build between the Milk Room and the Shed portion. I have all the wood cut but don't have the wall constructed yet. Since the area where the Milking Parlor will be is where we store feed for the cows, the lights will help out immensely at night feeding.
Let there be LIGHT!!!! Ain't it wonderful!!
My hope is to build a door for this end of the shed that folds in the middle like a closet door. I will weld the frame and cover it with metal siding. Pray for me!!!!
Day 5 March 7, 2010 before lunch
Today I did a good bit of work but no photos. I put in 3 more 4x4 posts for walls and doors. 2 posts went in the area between the Milking Room and the Milking Shed. I also went ahead and built this wall so there is an official divider between all the rooms in the suite. (Anyone notice I changed the title of the thread to Construction of a Milking Suite)
This entire side of the barn will be dedicated to all things Leche de Vaca and therefore it is the Milking Suite. Milking Parlor, Milk Room and Feed for Cows.
Cut the opening for the window. Hope to hang the other 3 doors tomorrow and will post more pics.
Day 6 March 8, 2010
Today the doors were hung. And I'm leaving now to go pick up the metal for the exterior siding on the Suite.
Oops the milkmaid showed up for work early ;D ;D ;D
Day 7 March 9, 2010 Before Lunch
Today Linda and I put the siding on the long side of the Suite.
AFTER LUNCH - TRAGEDY STRIKES
Three old hens Frame the new chick....
The framed bird pleads for her life.......... She threatens to jump and end it all. Stay tuned for this egg-cracker of a story. Omelet team is on the scene.
Day 8 March 17, 2010
Today I built the folding end door. This was really a project within a project. It took all day to figure the sizes, cut the metal, figure the angles, weld the two folding door pieces, weld the hinges, mount the door to the parlor, attach wood to mount the siding and then mount the siding and the door latch. Hope the photos give a little description.
The crew checking out the finished product.
Keep checking back and I'll add more photos.


